
Today it’s time for one of my (very) occasional articles. I will be a (mostly) rant-free discussion. This article, like Lord of the Rings, is meant to be the story of a journey. Our quest to rediscover the fun of Lord of the Rings the Card Game.
The Task
I decided that I wanted to work through a full campaign. My wife wanted something set in Gondor or Arnor, which confronting either the Heirs of Numenor (need mono-sphere and the ability to tackle siege/battle questing) or Carn Dum (a definite top-five contender for worst quest ever). I decided to go for Arnor, as Carn Dum is a fair way down the line, and by then we would either have figured things out well enough to make a creditable attempt, or given up.
Taking the Hobbits to Angmar (mar, mar, mar)
Don’t be hasty
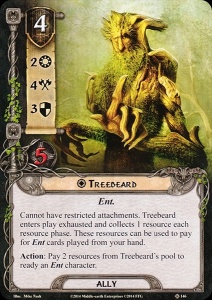
The next task was to build decks. The only original/recently-built deck I had, was a Hobbit/Ent deck – Black Riders Merry & Pippin + Folco, with Folco being there to offer early resources then, if necessary, drop threat so that you can avoid enemies long enough to get a board full of Ents established (Treebeard being the most important). For a cycle like Angmar Awakened, I wasn’t at all convinced that would work – it was too slow, and the heroes had too few hit-points. Still, I figured I’d test it out.
Playing on Easy mode, I managed to get Treebeard and a Booming Ent out on turn 1 – knowing I didn’t need to make any optional engagements, I quested with everyone for 7. I revealed a side quest, losing Iarion, but made a single progress. Turn 2, more Ents in play, Treebeard and the Booming Ent ready – then I got a treachery that revealed another card for each quest in play (2), then drew a location, an Angmar Orc (when revealed: discard an ally from play or reveal another card) then another one. Then yet another enemy. Despite questing with all my heroes and an ally, I’d failed questing by 6!
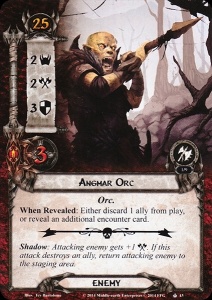 The Angmar Orc is a great example of how the game has skewed so badly in recent years. For one thing, he’s a hefty enemy – 3 hit points, 3 defence is no joke – Treebeard was the only character who could even damage him on his own. In any of the early cycles, those stats alone would be plenty for the card to contain. Now though, he comes with this pseudo-surge effect: previously surge like this was for flimsy little goblins only. “Easy” mode is anything but.
The Orc War Party, who are the centre-piece of this quest, prevent enemies in the staging area from being damaged, which meant that there was no point even trying my Direct Damage deck (Thalin, Argalad, Beregond), as too many of the features simply wouldn’t work. I was left with a choice of either trying out my Silvan/Victory Display fellowship, or trying to build a new pair of decks.
Where Now are the Dunedain?
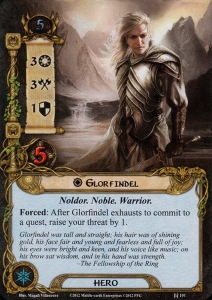
I needed something that could handle lots of enemies – realistically that meant a Dunedain deck – Aragorn, Amarthiul, Halbarad, Mablung (not a Dunedan, but fits the archetype well). Then I would need a support deck, something that could quest a lot, and could heal (ideally with card draw and threat control as a bonus). Elrond and Glorfindel + someone seemed a good fit here (Elrond for healing, Glorfindel for low threat, both give access to powerful Noldor cards, and you can get Asfaloth, Vilya etc). Amarthiul appears in objective ally form in several of the quests in this cycle, so I ruled him out.
 In the end, I created a completely illegal, but fun-looking fellowship that I called “The Once and Future King” – A Halbarad/Mablung/Tactics Aragorn deck on one side, and an Elrond/Spirit Glorfindel/ Lore Aragorn deck on the other. Rather than include them here, you can find the Fellowship on Rings DB.
Both of the decks struggled a bit with card draw, and there were definitely issues getting some of the key cards (I really needed Song of Kings, as Mablung racked up an ever-bigger stack of cash, and I only found Leadership cards to play).
I’d used Sword that was Broken in Dunedain decks in the past, but found it really hard to get out cost-wise, and that I wasn’t sending enough people to the quest to make it worthwhile. For this fellowship, adding it to Loragorn meant that the Willpower boost was typically a lot more effective/worthwhile, even though it’s still hard to afford early on.
Raiment of War (for Vigilant Dunedain) – 6 is a lot of resources, but you get a 3 defence, 5 hit-point, non-exhausting enemy (that can be healed)
The version here is more-or-less what I used from Deadman’s Dyke onwards. Early drafts had more mounts and fewer weapons, but this just felt a bit easier to leverage.
Beginng the Campaign
The first two quests – Intruders in Chetwood and the Weather Hills – saw a fair amount of chopping and changing on our part, as we got used to the rhythm of the decks.
 One thing I did notice about ‘Easy Mode’ is how thick and fast the side quests come. This was the first box to feature side quests, so there were quite a lot of them anyway but, as none of them get removed when filtering out the non-easy cards, the concentration is quite high early on, making the Encounter Cards that are X “Where X is the number of quest cards in play” particularly nasty. However, that also means that, once you’ve weathered the early assault, you’re probably fairly well set, as most of the really game-wrecking treacheries have been removed.
Continuing the Journey
 The next steps went well too – we cleared Deadman’s Dyke, and the first quest of the cycle proper, Wastes of Eriador. I’m still not a fan of Wastes – it has an annoying feature where every other round it’s night and you can’t place progress on any quest, plus an incredibly irritating treachery that suddenly makes it night mid-way through the quest phase. Fortunately, in “Easy Mode” you can survive the extra rounds (there is still A LOT of combat, and the Wardens of Healing + Elrond’s effect were working overtime), and we got out the other side in one piece.
Getting out of Here
Escape from Mount Gram is probably the quest I know best in this cycle, I haven’t started it quite as many times as Battle of Carn Dum, but a lot of that is down to the fact that it’s (broadly) an easier quest), at least for solo play. For anyone not familiar with it, this quest is basically a prison break – all your allies, mounts, items and artifacts are taken away, and you need to get out of the dungeon despite starting with only a single hero, and whatever was left of your deck (generally events and condition attachments).
Looks like you’re on your own
One of the biggest challenges of this scenario was the way it splits your party up – the Elf deck was alright starting with Glorfindel only, particularly with a decent chance of drawing into Light of Valinor and/or Unexpected Courage early on, but solo Halbarad is a different proposition altogether: on our first attempt, I had to engage a couple of enemies to avoid the staging area getting completely gridlocked, and then got killed by a nasty shadow card or 2. Second time round, things went a bit better: I was still mostly just treading water, but managed to survive long enough to team up with the elves. A lot of cards in this scenario have the “capture” mechanic, with some of the cards that were taken away from you at the start being hidden underneath them and returned to your hand (or sometimes directly to play) when that card is dealt with. By the time we joined together, Elrond and Glorfindel, were backed up by Arwen, Yazan, Gildor, a stargazer and a healer!
The Dunedain came good in the end, managing to 1-shot the boss enemy as we burst out of the dungeon. Victory at the second attempt, and onto the next.
There’s Moor!
Once you make it out of Mount Gram, you need to head Across the Ettenmoors, where you will find a lot of trolls. It’s a quest I’ve only played once or twice, notorious for being the pack which gave us the truly dreadful Hero Dori.
This is an odd quest, and re-playing it didn’t massively alter my feelings in that regard – Stage 1 forces you to have a side quest in play every round, and as mentioned already, the side-quests come pretty thick and fast in Easy Mode anyway. By the end of the game, we’d cleared out the full set of side quests, and with only a limited number of enemies in the deck, it was just a case of surviving until the side-quests had been cleared, then a fairly easy move to the end.
 After the Ettenmoors, came the Treachery of Rhudaur – this is very much a momentum quest, with a hard-cap 5-round time-limit on stage 1, as you try to collect various side-quests which turn into objective-attachment rewards. This was definitely a quest where the easy-mode set-up made a big difference, and even though there were points where we got a bit swamped by enemies, we got all 3 objectives, and completed the quest fairly comfortably.
Battles lost and… lost
 The penultimate quest in this cycle is The Battle of Carn Dum. Quite possibly the worst quest ever designed for the game. Being tortured by Nazgul who want you to surrender the location of the one ring is probably quite pleasant in comparison.
For a 2-player game, you start with a 4-threat boss enemy in the staging area, a 2-threat location, and 2 1-threat* enemies. (so, that’s 8).
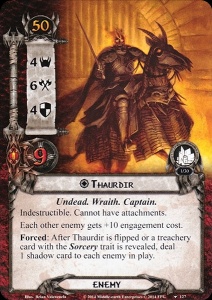
 Carn Dum does a lot of playing with Shadow cards: the “1-threat” enemies get +1 threat for each shadow card they have. The boss enemy deals a shadow card to each enemy in play every time a treachery with the Sorcery keyword is revealed. So, each sorcery treachery is cranking the threat up by 2, as well as its effect (and some have surge). Shadow Cards in Carn Dum are only discarded once they are resolved, so as long as these sit in the staging area, the threat is just going up and up.
Of course, you can engage the enemies to avoid their threat – but at 4 attack, 3 defence and 5 hit points, you’re likely to take significant damage, and probably won’t kill it in a single round.
I haven’t crunched the numbers, but I think realistically you’re looking at having at least 12 threat to quest against in round 1, as well as having to take on at least an enemy each (and a big one at that).
Every few rounds, the boss enemy is going to get up to having 3 shadow cards on him, at which point he flips, makes an immediate attack against the first player, and suddenly lowers the engagement cost of every other enemy in play by 10, at which point you get swarmed by anything that hasn’t engaged you already.
We played this 3 times, not coming close to beating it on any occasion.
The point of this exercise was to play through a full cycle with a pair of decks – I’ve made tweaks as we go along, and certainly wouldn’t mind making a few more. But there’s a difference between tweaking and completely custom-building new decks, and I just can’t see any version of these decks beating the quest. Given that the other point of this whole activity was to have some fun, I decided to just give up and move on…
The Final Battle
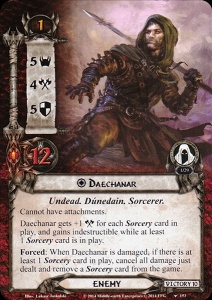 Final scenario in the cycle is The Dread Realm – we definitely had to grapple with this one, taking a long time to get anywhere. The big new thing, is face-down cards from players decks (or occasionally their discard piles) being “reanimated” as 2-2-2-2 undead enemies – there are lots of effects that will reanimate more cards, and other cards which key off of it, so this is a fairly major thing to deal with. Once you get through the early part of the game, there is also a fairly nasty end-of-campaign boss in Daechanar (an evil spirit who has stolen the body of your kidnapped friend who you have spent the campaign trying to rescue). He gets +1 attack for every sorcery card in play (there are various treacheries with this keyword that turn into attachments), and cannot be damaged whilst these are in play – instead you remove a Sorcery card from the game for each instance of damage: as there’s a chance that more sorcery will be churned out every round, you need multiple ways to damage him each round to be able to take him down.
We got there in the end, but it was a bit of a slog, and we felt pretty exhausted by the end.
Final Thoughts
As I said at the start, this campaign was about trying to recapture the fun of this game, and overall I think it succeeded. In some instances “easy” mode definitely was easy, and I wouldn’t have minded a bit more of a challenge, but there were plenty of other times when it was still tough, and at least one scenario (Carn Dum) that remained stupid and broken.
I like this approach to the game – building a pair of decks and trying to take them through a broader sweep of scenarios. Inevitably, I think that’s going to need to still be on Easy Mode, because I don’t want to have to micro-tweak the deck before/after each and every scenario. I no longer promise/threaten regular content updates on this blog, but I might post periodic threads like this if the content presents itself.

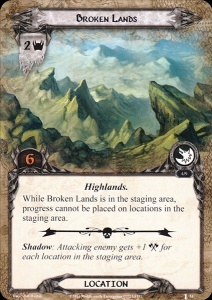 One of the few encounter sets which did show up repeatedly, was Broken Lands. First appearing in the Second Scenario, To Catch an Orc, it had 3 copies of 1 hideous location, the eponymous Broken Lands themselves. Whilst they only had 2 threat, they were a chunky 6 progress to explore, and has a passive effect which prevented progress being placed on locations in the staging area whilst they were in the staging area. The rest of the locations in that scenario were, actually, not that huge (average threat/progress of 3), but there was one – Methedras – which boosted the threat of all the others, and things could swiftly get out of control. Essentially, once you drew Broken Lands, you had to travel and clear it, before you drew another copy – in high-player counts, an early one of these basically meant instant location-lock.
 Easily my favourite scenario of this cycle was Trouble in Tharbad – it got a bit of stick when it came out (especially from some of the power-gamers) for being too easy, but in my book, that was a significant part of its charm: this was a scenario that allowed enough scope for players to try different things out, rather than just charging full-tilt with an aggro deck at everything. (it’s worth remembering that this is around the time that the One-Boromir-to-rule-them-all deck first came to prominence).
 The trouble with Tharbad is that it was followed up immediately with the absolute slog that is Nin-in-Eilph. The positive about this quest, is that it captured very well the feeling of trudging around in a swamp whilst hopelessly lost. The problem is that trudging around in a swamp whilst hopelessly lost is a fairly miserable experience – it isn’t really one which you want to recapture accurately! Finger of Glanduin acted like a reverse Northern Tracker, eating away the progress on locations, whilst Sinking Bog gave characters -1 to all their stats for each Item they had.
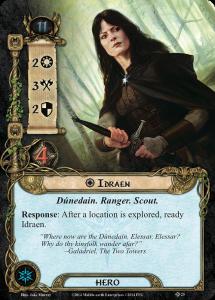 At least the Ringmaker cycle did give some scope to allow the players to tech against all these nasty locations. A new hero, Idraen was probably the first to interact directly with locations, and her ability to ready after a location was explored allowed long-neglected cards like Strength of Will to make a come-back: if you can travel to a location which only needs 2 more progress, this card essentially allows her to explore it for free.
 This card always felt a bit lacklustre to me: it draws my mind back to a “Strider” custom hero I made several years ago, a Spirit version of Aragorn who acted as a Thalin for locations, placing 1 progress on each location revealed whilst he was questing. Given the size of modern locations, I really don’t think that the card would have been overpowered if it had done this, and my lack of enthusiasm is unlikely to change, but it is at least cheap enough that if you’ve got a scout who’s going to be questing every round, there’s little reason not to slap it on her.
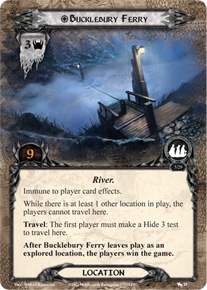 There are quite a lot of locations in the first quest, and this becomes particularly problematic when you reach the final stage and are attempting to travel to the Buckleberry Ferry – this unique location is immune to player card effects, and can only be travelled to if there are no other locations in play. In our experience, this can lead to round after round where you smash the questing, but can’t clear enough locations in 1 go to be allowed to travel (there is some help available from the quest card, but in 4-player it’s often not enough).
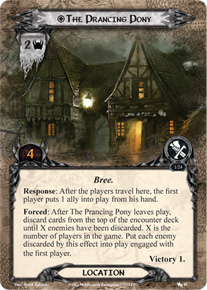 Moving on to Bree, there are more unique locations, starting with The Prancing Pony and proceeding on through Midgewater, to finally end up at Weathertop itself. The unique locations give shape to the overall narrative of the quest, and have fairly powerful effects, both good and bad. This pattern is continued in the Flight to the Ford, where the Last Bridge and Ford of the Bruinen draw directly from the books for their abilities.
 That said, the decision-making in this box often felt very constricted: many of the unique locations are put into play by quest effects, or need to be explored before the stage can be completed. As such, whilst we see these iconic locations as we go along, there’s actually fairly limited interaction with them – you travel when you have to, and explore them once you’ve mustered enough progress. That’s about it.
 Box 2 (for book 2, none of this nonsense about Lord of the Rings being a Trilogy) felt to me like they’d managed to strike more of a balance with the locations – the fact that we had already spent so much time in Moria meant that the designers had already had plenty of chance to play around with mechanics that might represent the Doors of Durin or the Bridge of Khazad-Dum, and these certainly felt like the refined version. The first quest out of Rivendell could well prove to be the death of the hobbits, as damage is scattered across locations, triggering in turn cascades of nasty effects.
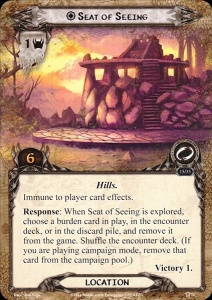 The final quest returns to the stacked sequence of unique locations, and gives you very little choice over what to do in the early rounds, along with providing heavy punishment for certain deck-types. Whilst the initial stages can get annoying though, I’m generally prepared to give them a pass, because I’m such a fan of the way the latter part of the quest is done: I really like the multiple staging areas, and the way cards move between them, it felt like a clever way of representing a party scattered across a fast-flowing river, and made for an enjoyable experience. In campaign mode, the Seat of Seeing adds another fun element of decision-making, as you have to weigh whether to stall the quest a little longer in an attempt to get rid of those burdens.
 Overall, I think the first 2 Saga Boxes for Lord of the Rings did a really good job of capturing the flavour of the books, and the latter box in particular managed to convert them into enjoyable quests to play. Although these two boxes relied quite heavily on having cards that were unique to each quest, I actually thought that some of the most interesting locations came in the sets that were shared across multiple quests, The Old Road and Pathless Country. Both of these offered fairly low-to-middling stat-lines, but combined them with effects that forced players to make choices – The Old Road can be gone in a heartbeat, if you take on the peril of another Burden. The Pathless County can be left and tracked over the course of several rounds, but it will take a long time, due to those conditional extra progress tokens – this type of mechanic, where players are given meaningful choices definitely scores them points in my book.
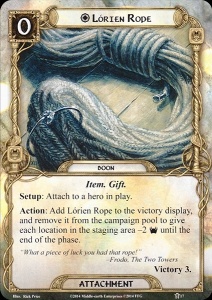 One thing that the Fellowship of the Rings boxes didn’t really offer a lot of, was new cards for players to deal with locations – in fact, there was nothing within the standard card-pool that would allow us to manipulate threat, progress, or effects on locations. The “Lorien Rope” Boon provided a powerful effect, reducing the threat of every location in the staging area by 2 for a round, but to trigger it, you had to remove the card from the campaign pool, so it wasn’t something you could really rely on, even in campaign mode (and wasn’t available at all outside of it).
 Ostensibly the biggest change in this cycle came with the new mechanics: Battle and Siege, which turned the game on its head as characters were required to quest using their Attack or Defence respectively, rather than their traditional Willpower. It was also, perhaps a last hurrah for the idea that this game was primarily based around Spheres of Influence, rather than the “Tribal” themes which drew together decks of mostly Dwarves, Elves, Rohirrim, or Gondor, as the player-card pool received a series of cards which supported players running Mono-sphere decks.
 Starting Active Locations with unpleasant effects were also a big thing in this cycle. Whereas earlier in the game’s life we had tended to see these locations start in the staging area, now it became more common for their effect to be in play from the word go – whether that be the
 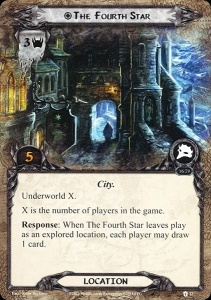 The Against the Shadow cycle itself saw a wide variety of locations, any many of them reflected that quest’s unique: Underworld in the Steward’s Fear, Villagers in Encounter at Amon Din, Hidden Cards in The Blood of Gondor. Even when the keyword itself was not directly carried across, there was a stronger sense of thematic tie-in in this cycle: for example all of the resource denial in Druadan Forest to complement the Prowl Mechanic, or the wat that locations in The Morgul Vale tried to add progress to To The Tower, or else simply flung things back to the staging area in order to slow the players down.
 The overall effect of this was to make locations something that was much more of an issue than in earlier cycles – you certainly could just track away most of the places you went in the Steward’s Fear, but if you did so, there was a very real danger of getting suddenly ambushed by a large number of enemies from the Underworld deck. If you didn’t come with ways of dealing with the Druadan Forest, the Woses and their accompanying treacheries suddenly took on a rather fearsome aspect, with Threats of X and high archery totals. Encounter at Amon Din was largely an exercise in exploring as many locations as possible as fast as possible: Mostly low-threat, high progress, they look like ideal targets for the Northern Tracker, were it not for the Villagers burning alive round-by-round.
 Probably the most notable Quest of the Cycle from a location perspective though, was Assault on Osgiliath. This was ostensibly a street-fight, a back-and-forth tussle to take the city, street by street, location by location. When a location was explored, the players took control of it, potentially bringing a benefit, but more commonly just another condition they needed to watch out for which could see that control lost if they left an attack undefended or a character was destroyed.
 The overall objective for Assault on Osgiliath was to control all the Osgiliath locations at the end of the round and, as originally printed, it was rather broken – you could
  The Heirs deluxe box probably contained the most direct attempt at location control, A Watchful Peace – this was a spirit event which allowed players to return innocuous locations to the top of the encounter deck after they left play – interesting, but hardly powerful.
 As we’ve played this cycle mostly 2-player with a little bit of solo, it’s generally been about choosing a single escort for the Dreamchaser, and the choice has almost always been Narelenya. The once-per-round cost reduction of an ally is a really powerful effect in almost any deck, and it’s particularly true of my wife’s current Gondor deck, and of course, my tried-and-tested solo deck: Play as many Dwarves as you can.
 On the flip side, threat reduction is nice, as offered by Silver Wing, but is the +1 attack per hero worth it? Potentially with the difficulty of Corsair bashing this is one we should investigated in more detail but I can’t recall ever using this solo or 2-player. Perhaps a Lorgaron deck might be able to get better mileage out of, but for us it never felt worthwhile. It would actually be quite nice if you could leave out the Dreamchaser, and have Dawn Star and Silver Wing balance each other out in solo, but sadly this is never an option.
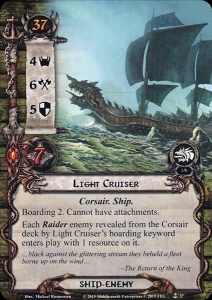 Most Ship enemies had a few things in common – big stats, the “Boarding” Keyword, and limited interaction with other player-card types.
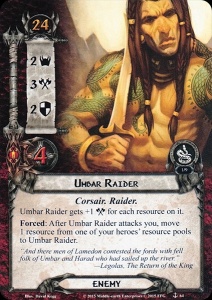 Beyond that though, it just made the burden of combat feel too uneven. We’ve played quite a few quests this cycle combining a fight-y Gondor deck and a Spirit Questing deck – once the Spirit deck has properly got set up, it has some decent combat potential (Idraen and Lanwyn are amongst heroes, and it also runs ally Glorfindel, Northern Trackers and Rhovanion Outriders) – against a normal enemy or two, it can handle a fight. What it can’t deal with is a massive boat AND a few random pirate enemies thrown in on top, especially when many of those pirates have resource-stealing mechanics which make them more and more powerful if you can’t kill them in a single round. Even for the Gondor deck, defending a ship with their ship, defending a handful of Corsairs and being expected to strike back again, is a major problem – if you don’t have Boromir the Steward of Gondorian Fire set up, along with a bucketload of threat-reduction, it’s just not feasible, and that’s coming from a deck that’s designed to be able to handle combat.
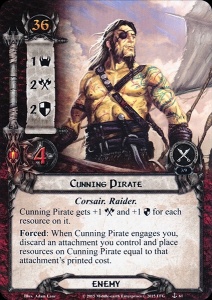
 There were various different ways that they represented this – my personal favourite was the Cave Torch, which allowed you to place progress on a location, at the cost of possibly adding another enemy to the staging area. This is perfect thematically – if you shine a light, it’s easier for you to see the cave, but also a lot easier for a nearby goblin to see you – and also felt like it really added to the decisions you needed to make. There were plenty of other locations in the Kazad-Dum boxed set that offer similar high-cost options you could take to alleviate a problem, like the
 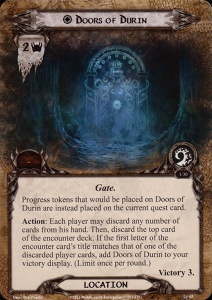 Location-wise, there were still a few gems: the
 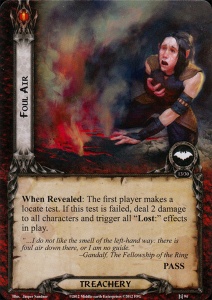 Much like quest 2 of the cycle, The Long Dark is a quest I’ve largely shunned, as it had what was essentially a “cancel this or lose” card – Foul air
 By and Large, the locations of the Hobbit boxes were not that numerically different from the others around in the game. Admittedly, there were a couple of really gentle locations before you left the shire, but overall, the numbers were not that much lower than the Dwarrowdelf cycle, and probably still a bit higher than Mirkwood numbers..
 Asfaloth, as most players of the game will know is a Lore Attachment. Too early in the game’s life to follow the conventions later established for Mounts, he is not Restricted, although he can only be attached to a Silvan or Noldor. Most of the time though, you’ll want to attach him to Glorfindel as, once you’ve done so, he can be exhausted to place 2 progress tokens on any location.
 Massing was the first Gen-Con scenario, a place that has typically seen the most punishing and brutal quests hurled at players. The game starts with 3 enemies in play per player, and concludes with a boss fight against the Witch King whose 666 stats were considered truly frightful at that point in the game’s life.
 Of course, Asfaloth wasn’t the only location control card released during this period, he was just much, much better than the others. It is still worth spending a few moments thinking about some of the others though, even if their impact was less than the mighty Asfaloth.


 It’s worth giving specific mention at this point to The Hills of Emyn Muil, one of the most heavily criticised quests of the early days of the game. Hills required players to amass a certain number of victory points, and have no Emyn Muil locations in the staging area.
 It wasn’t necessarily an easy quest – the 2 locations which started the game in play were both big, and had nasty effects that could really put the hurt on you. That said, if you were still alive by turn 3 or 4, and had a Northern Tracker out, it was probably going to be plain sailing from hereon in…
 It’s also worth mentioning Core Set Legolas. Whilst 2 progress may not seem like a huge amount, it’s surprising just how many locations in those early days could be taken out with only 1 or 2 progress tokens. That meant that if you were confident of having Legolas kill something during the combat phase (and as a 3-attack ranged character, the odds were always good), then locations which ramped your threat during the refresh phase, or stopped you from drawing cards during the resource phase wouldn’t actually stick around long enough to be a problem.
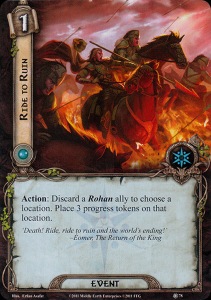
 It also struggled with questing, and threat –as I had Lore in there, there was the suggestion to just take a load of Ents, but I was trying to keep things thematic, so I opted instead for a string of cheap allies (Errand Riders, Squires of the Citadel, Envoys of Pelagir) and upping the quantity of Visionary Leadership in the deck.
 I still think that this deck needs to be paired with something relatively heavy on Threat reduction (ideally a Galadriel deck that can use Elrond’s counsel to keep its own threat in line, and play Galadhrim’s Greetings / just use Galdriel’s power on the Gondorians.)
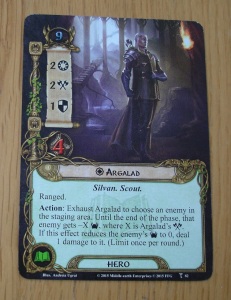 This is pretty impressive: with 2 attack and 2 willpower, his enemy threat-reduction is just as powerful as his questing (provided you have an enemy in the staging area to target), and with low-threat enemies, he and Thalin together mean that you’re dealing 2 damage to an enemy the round it’s revealed. Given how many enemies there are these days with stupidly high defence values, being able to bypass that and go straight to hit-points is a big deal.
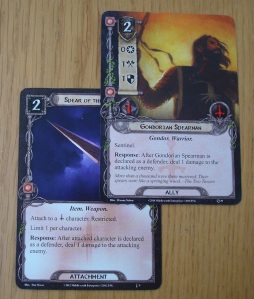 To build a direct-damage deck, I started with Thalin and Argalad. A lot of the cards which followed were fairly self-selecting:
  As a note on the 3rd hero, this deck tends to go two ways, depending on the number of players and the quest. I started with Beregond, who can take a Spear of the Citadel for Free, and if you manage to give him a Gondorian Shield as well, can comfortably tank attacks from most enemies. Sadly, Beregond is a bit of a 1-trick pony, and in a quest without those big hitters, a more rounded option like Mablung is probably better: he still blocks for 4 with a shield on him, and provides some resource acceleration (making him a good target for a song of wisdom), and a questing option once your allies are set-up (the Mablung iteration also includes Wingfoot to try and find some action advantage.
 We managed to beat Thing in the Depths using this deck (Beregond version) alongside the Denethor and Sons deck – the second half of Thing in the Depths feels a lot like an updated version of Watcher in the Water, and Argalad and co performed admirably. I’m still a little way behind on the Dreamchaser cycle more generally, so I may carry on with these two as we try to catch-up.
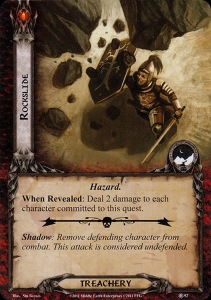
 Beyond that though, it’s a lot more complex. Boromir may have fallen into evil for a while, but he clearly rallied at the last moment, sentinel defended a number of attacks, and then discarded himself to deal 2 damage to each enemy in play.
 Saruman the White, head of the order of the Istarii, and a mighty Maiar sent to Middle Earth for the aid of the free peoples. Of course, we all know that he went bad in the end, but for a long time, he at least seemed to be working on the side of good (although from watching the White Council scenes in the Hobbit films, you would have to wonder how everyone else missed what he was up to…)
 Grima Wormtongue is another figure who fans of the books or the films will struggle to see as anything much besides a villain. However, he has appeared in 3 very different guises in the card-game: As a hero, an enemy, and an objective ally.
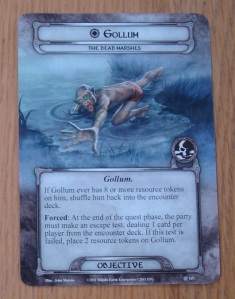 The concept of this card that might be working for you, and might be working against you was taken to another level with the rise of the double-sided card. The most obvious character from Tolkien’s lore to be given this treatment is Gollum/Smeagol.
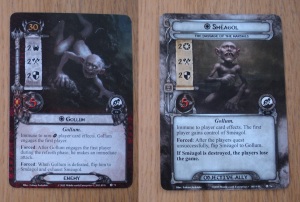 It was only when Gollum re-appeared for Land of Shadow, the second of the two Saga boxes to cover The Two Towers, that this was really taken to the next level. Land of Shadow Gollum starts out as a remarkably resilient enemy (the quest card gives him randomised defence boosts which really get in the way of trying to take him down) who can – ultimately – be defeated, and flipped over to the objective-ally Smeagol. Smeagol is now an objective ally, someone who will help the players, guiding them through the Dead Marshes. Even then though, you need to be careful, as an unfortunately-timed treachery, or a poor quest phase, can flip him back to Gollum again at a moment’s notice.
 [This is where the Spoilers start] Of course, whilst much of what we see in Lord of the Rings LCG is drawn from Tolkien’s Lore, the designers have also, particularly in recent cycles, put a lot of effort into creating their own characters, to develop new stories. This, of course, gives them more space to explore the idea of characters whose motives may be more complex than they appear.
 For some people, there was always something about Alcaron that felt a bit off- his uncanny knack of turning up just as things were falling apart – it all seemed rather suspicious. Personally I had missed the hints we were given, but once we entered The Morgul Vale, all doubt was removed, as he was revealed- a Black Numenorian who had been plotting against us all along, and who was behind the kidnap of Faramir.
 Fast forward a couple of years to the present and, early in 2016, we got two new enemies – Captain Sahir and Na’asiyah. As prominent Corsairs, these FFG-created characters seemed like logical inclusions for ship-to-ship fighting, but they had the interesting additional feature of being double-sided, capable of becoming allies at a later point in time. We didn’t know what this meant for the future, but we had to assume the cards had been printed like that for a reason.
 Intrigued but uninformed, we continued into the Dreamchaser cycle, still hunting pirates, all the way up until Thing in the Depths, at which point the sudden assault from a giant sea monster made us all re-think our priorities, and Sahir and Na’asiyah became our allies as we fought for mutual survival.
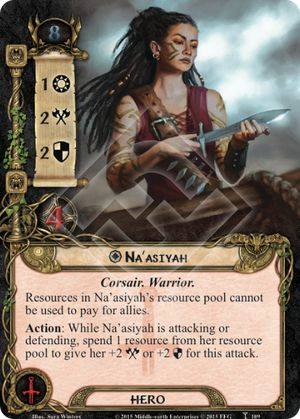 Na-asiyah’s Hero ability mirrors the text on both her Enemy and Objective Ally cards, with resources being turned into attack and defence. It is clear that she is still not trusted by everyone, as her resources cannot be used to pay for allies, but for now at least, she is fighting alongside us.
 We already know from the various spoiler articles we have seen, that the next cycle will see our heroes finding themselves in Far Harad, and that there will be at least one Haradrim ally. It looks like the designers will continue to explore the question of who t is truly “evil” and who can be redeemed. I look forward to seeing where it takes us.
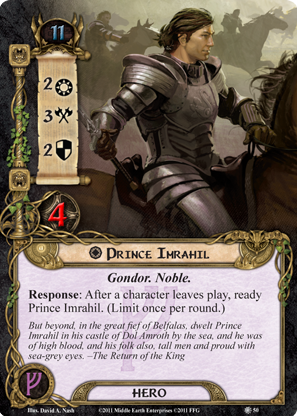 Prince Imrahil is one of the most important book characters not to make it into Peter Jackson’s cinematic adaptation, but he has long had an important place in the card-game. His simple, yet effective ability to ready when a character leaves play means that he pairs brilliantly with his son-in-law (Eomer), but can also offer you great action advantage in conjunction with Silvans, chump-blockers, or anyone using sneak-attack Gandalf a lot.
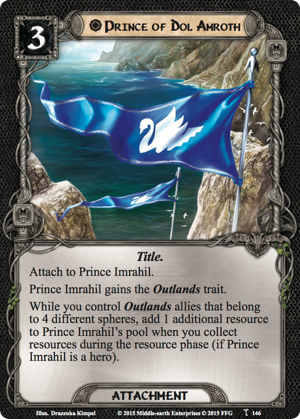 Although I’ve not seen it used in action yet, Prince of Dol Amroth already feels like a great choice – alongside
  Not long after Prince Imrahil, things are going to heat up as we head way, way, down south, to the hot sand of Far Harad. Detail is still fairly sparse at this stage, but we do know that alongside battling desert wildlife and searing heat, we can also expect to see Mumaks, and plenty of them. More Mumak enemies isn’t what anyone needs to see, and there’s
  So far, we’ve only had objective Mumaks spoiled, and it’s unclear whether we’ll get a proper player-card Mount attachment that’s a Mumak, but we can hope.
